Ansible:
========

Configuration Management(CM):
-----------------------------
A configuration management is refers to the process of systematically handling the changes to a system.
A configuration management (CM) system is used to keep track of an organizationís hardware, software and related information.
This includes software versions and updates installed on the organization's computers.

with respect to IT, it covers set of things like below
	@hardware
	@software
	@Network
	@People
	@Process

- it turns your infrastructure as a code.
           - means it not converting your infrastructure as a code, it just defining your infrastructure as a code.
- Why ansible is a infrastructure as a code, because
	       @ is your infrastructure is versionable
	       @ is your infrastructure is repeatable
	       @ is your infrastructure is testable
               if you agree with above 3steps, then ansible is going to act as "infrastructure as a code".

Chef vs Ansible
---------------
Herculean task for Administratiors:
----------------------------------
As a sysadmin we do:(Pain Points)
Create/delete users
Taking Backups
Deploying Applications
Configure servers
Documenting steps
keep maintaining systems
keep repeating ourselves, so boring
Rely on our memory (what conf we had did on what server)
STATE:
-----
- The undelying problem is STATE of the server (here state can be a backup,user creation or application any thing)
- STATE is a snapshot of your configuration
Eg:- for ruby:- file '/home/hello.txt' do
action: create
content:'welcome to chef' --->> this is STATE of file b/n do and end.
end.
By adopting configuration management tools, you will benefit from:
-----------------------------------------------------------------
* Reduced risk:- of outages and security breaches through visibility and tracking of the changes to your systems.
* Cost reduction:- by having detailed knowledge of all the elements of your configuration, avoiding wasteful duplication of your technology assets.
* Strict control:- of your processes by defining and enforcing formal policies and procedures that govern asset identification, status monitoring, and auditing.
* Greater agility and faster problem resolution:- enabling you to provide a higher quality of service.
* Quicker restoration of service:- In an outage, you'll be able to recover quickly as your configuration is documented and automated.
* Increase uptime
* Prevent Errors
* Code re-usability
Alternatives:
-------------
Puppet/Chef/Saltstack...etc
Why Ansible:
-----------
* "Redhat" people developed "Ansible" and now recently "IBM" is taken over "Redhat" (so, it is very compatable to run redhat tools in redhat machines)
* No need to go with huge configurations and setup compare to chef and puppet.
* pull mechanism(agents has to pull the things from server)
* lot of learning is required for chef and puppet
* yaml code, which is very secure and easy to learn
* workstation less
* Relies on ssh
* it uses Python internally(no need to write python programming/script)
* Push Mechanism
@ we have to install ansible in one machine and push the configuration and all to other machines through ssh connections.
What is Ansible:-
-----------------
- Ansible is an automation platform that configures and manages your infrastructure, whether it is on-premises or in the cloud.
- Ansible is a independent
- you only need to tell to ansible what the desired configuration should be, not how to achieve it.
- Tell what to do not how to do. (Ansible YAML Code)
eg: 1. check whether the package is installe or not
2. install git 1.2
3. we need to compare whether git 1.2 is compatable to our system
4. if not, then install git 1.3 version
5. return values
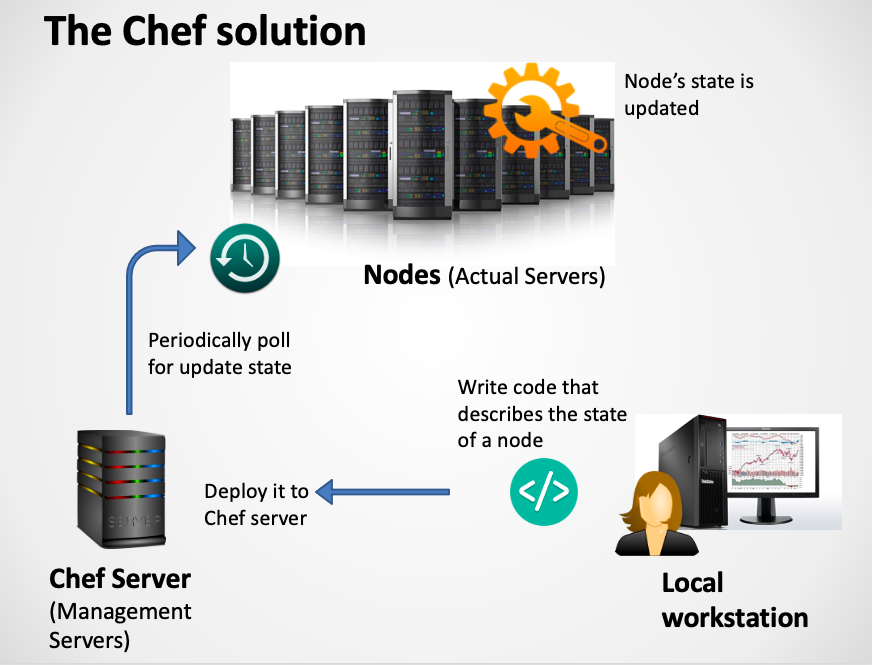
Archetecture:
-------------
Ansible Server ssh
YAML--------------------------------------------------------------------->>Nodes(collect all the info about the system)
- note: workspace/station where we going to write code, which describes the state of server
- yet another markup language (or) yaml ain't another markup language
Configurations:
--------------
1. cat /etc/ansible/ansible.cfg
2. cat /etc/ansible/hosts
3. vi /etc/ssh/sshd_config
Ansible Installation in Physical Server:
========================================
1. Need RHEL Above 7.1
2. yum update
3. Install yum repository/server
4. epel enable link :- yum install -y https://dl.fedoraproject.org/pub/epel/epel-release-latest-8.noarch.rpm
5. verify repos :- yum repolist (or) yum makecache
6. yum install -y https://releases.ansible.com/ansible/rpm/release/epel-7-x86_64/ansible-2.9.1-1.el7.ans.noarch.rpm
7. ansible --version
8. yum update ansible --> to get latest version
Note:- on RHEL 7 it is recommended to also enable the optional, extras, and HA repositories since EPEL packages may depend on packages from these repositories.
Note:- subscription-manager repos --enable "rhel-*-optional-rpms" --enable "rhel-*-extras-rpms" --enable "rhel-ha-for-rhel-*-server-rpms"
step1:- go to ansibel default configuration file "/etc/ansible/ansible.cfg" and uncomment the inventory.
>> what are the different machines to which ansible has to connect and do some configurations
step2:- enable sudo_user in the same confg file.(/etc/ansible/ansible.cfg)
step3:- create users in both node and server and add sudo privaliges in visudo
ansible ALL=(ALL) NOPASSWD: ALL
Ansible Installation in EC2
===========================
1. launch redhat EC2 instance in aws
2. become a root user
# sudo su - (or) sudo -i
3. update your EC2 Instance (in Ansible-Server and node)
# sudo yum update -y
4. adduser/useradd VmTutes (in Ansible-Server and node)
5. passwd VmTutes (in master and node)
6. add VmTutes user in "visudo" (or) /etc/sudoers file for sudo permissions (in Ansible-Server and node)
# vmtutes ALL=(ALL) NOPASSWD: ALL
7. enable password authentication for VmTutes user (in Ansible-Server and node)
# vi /etc/ssh/sshd_config
# systemctl restart sshd (or) service sshd reload
8. for RHEL-8 and later we need to install python2/3 version which ever latest
# Note:- yum install python3 -y (you will get old version of python i.e 3.6.8) ---->> optional
# sudo yum install -y wget libffi-devel zlib-devel bzip2-devel openssl-devel ncurses-devel sqlite-devel readline-devel tk-devel gdbm-devel xz-devel expat-devel
# sudo yum groupinstall -y "development tools"
# cd /opt
# sudo wget https://www.python.org/ftp/python/3.12.0/Python-3.12.0.tgz
# sudo tar -xvzf Python-3.12.0.tgz
# cd Python-3.12.0 (Note: if it is not allowing try with root user)
# ./configure --enable-optimizations
# sudo make altinstall
note:- cd /usr/local/bin and hit ls command, you can see python config files.
# Defaults secure_path = /sbin:/bin:/usr/sbin:/usr/bin:/usr/local/bin (sudo vi /etc/sudoers )
# python3.12 --version
# pip3.12 install --upgrade pip (don't give in root user and don't use sudo command also in normal user.)
note:- python3.12 -m pip install --upgrade pip
note:- pip is default with python3 installation.
note:- pip3.12 -V (or) pip3.12 --version
note:- Pip is a package manager for Python that allows you to install and manage additional Python packages which are not part of the standard python library.
9. switch to VmTutes user
Note:- in RHEL-8 and above versions, we should install ansible in normal users.
Note:- we should not install in root user, bcz it doesn't work as expected.
10. pip3.12 install ansible --user (--user means, taking vmtutes as a user)
11. ansible --version
12. mkdir /etc/ansible
13. vi /etc/ansible/hosts and add node system ipaddress
Installation Troubleshoot
-------------------------
ansible vmtutes -m ping -vvv
<172.31.19.38> ESTABLISH SSH CONNECTION FOR USER: None
[vmtutes]
172.31.19.38 ansible_user=ec2-user
NOte:- node-machine also required python
Setting Hostname:
-----------------
- hostname/hostnamectl
- hostnamectl set-hostname vmtutes (host/system/server name)
- if you want to give a domain name for your hostname fallow below command
- hostnamectl set-hostname VmTutes.devops.com (Domain/DNS name)
Password less login using SSH keys:
---------------------------------
- ssh-keygen
- ssh-copy-id -i /root/.ssh/id_rsa.pub 192.168.222.130
- ssh-copy-id localhost(configuring on same machine)
Ansible Inventory:
-----------------
- inventory is a place where all the systems present to which ansible is to configure and run.
- default to be saved in the location /etc/ansible/hosts
- we can also specify a different inventory file using -i <path> in command line
Host Patterns:
-------------
- How to identify which machine i need to run specifically
- a pattern can refer to a particular machine or group name
>> ansible all --list-hosts('all' refers all the machines in the inventory)
>> groupname[0] --> picks the first machine in the group
>> groupname[1] --> picks the second machine in the group
>> groupname[-1] --> picks the first last machine in the group
>> groupname[0:4] --> picks the first five machines in the group(range)
>> groups sepertes with clolon uses to run hosts on multiple groups
> group_name1[0]:group_name2[1]
ansible all --list-hosts
ansible VmTutes --list-hosts
ansible localhost --list-hosts
ansible 192.168.9.130 --list-hosts
Ad-Hoc Commands:
----------------
- if you want to run any simple and one time commands we will use ad-hoc commands
syntax:- ansible [group-name] -m[module] -a[arbitary]
-a :- to run arbitrary(if you want to run any operating system commands through ansible use option '-a')
eg:- ansible VmTutes -a "ls -l"
ansible VmTutes -a "ls /root"
ansible VmTutes -a "cat /var/log/messages"
ansible local -a "touch hello_devops"
-m :- to run a module(operating system tasks)
eg:- ansible all -m ping
ansible all -m copy -a "src=hello.txt dest=/root/hello.txt"
install/remove a packages:
ansible VmTutes -m yum -a "pkg=httpd state=present" (it will install)
ansible all -m yum -a "pkg=httpd state=latest" (it will update)
ansible VmTutes -m yum -a "pkg=httpd state=absent" (it will remove)
start/stop a services:
ansible -m service -a "name=httpd state=started"
ansible -m service -a "name=httpd state=restarted"
ansible -m service -a "name=httpd state=stopped"
create/delete a user account:(instead of creating user with command 'adduser/useradd')
ansible VmTutes -m user -a "name=vinodh"
ansible VmTutes -m user -a "name=vinodh state=absent"
Add/Remove a cron job:
ansible tek -b -m cron -a "name='name_of_cronjob' minute='10' hour='11' day='19' month='12' weekday='5' job='ls-alh > /opt/null'"
ansible VmTutes -m cron -a "name='name_of_cronjob' minute='11' hour='12' job='cat /var/log/messages'"
Note:- if you not give cron columns then it will take default as "*"
ansible VmTutes -m cron -a "name='mycron' state='absent'"
(OR)
cron:
name: "my_cron"
minute: "2"
hour: "20"
day: "23"
month: "11"
weekday: "0"
job: "cat /var/mail/spool/vinodh"
job: "date > /dev/pts/2"
job: "mkdir /root/hello"
-b(become) :- To run as a sudo
eg:- ansible VmTutes -b -m ping
GREEN :- Ansible executes successfully, but it will not do any changes in machine(node)
YELLOW :- it did some new changes in the machine
RED :- if ansible is connecting to machine and failing in any step/task the it will show you "RED" colour
BLUE :- Warnings
Gathering Facts/Convergence/Idempotence:
----------------------------------------
- as soon as ansible connects to node-machine it gathers the information about the machine(node)
and it start comparing the state that what we have defined and what it has gathered,
in case it has diff then based on that it is going to udate/maintaining the state accordingly, if already in same state it is not going to do anything.
if we want to see what and all modules it is going to gather from machine, we can use
ansible all -m setup
ansible VmTutes -m setup -a "filter='ansible_nodename'"
ansible all -m setup -a "filter='ansible_dns'"
ansible all -m setup -a "filter='*ipv4*"
ansible all -m setup -a "filter='*swap*'"
If you want to save output to facts directory
ansible all -m setup --tree facts
Playbooks:
----------
- playbooks are ansible configurations, playbooks defines a policy you want your remote machine to enforce.
or set of steps. playbooks are returened in YAML format
--> usr/bin/ansible-playbook is used for running configurations from an playbook
--> ansible-playbook <playbook_name.yml>
# we have 3 section in playbooks
1. Target Section:- Defines the hosts against which playbook tasks has to be executed
2. Variable Section:- values that we were storing while running ansible and re-using whenever we want
3. Tasks Section:- list of all tasks that we need to run in order
YAML (yaml ain't another markup language)
----
* every YAML file starts with a list
* each item in the list is a key/value pairs.
* all yaml files begin with "---" and end with "..." (optional)
* all members in a list should begins at the same indentation level starting with "-"
--- # a list of courses
courses:
- devops
- aws
- digital marketing
- java
...
* key: value
---# a employee details
Employee:
name: vinodh
job: Devops Engineer
company: xyz
...
Eg(1):-
--- # sample playbook
- hosts: VmTutes
become: true
tasks:
- name: install ftp package
action: yum name=ftp state=present
Eg(2):-
--- # VmTutes initial YAML playbook
- hosts: all
tasks:
- name: remove ftp package
action: yum name=ftp state=absent
Eg(3):-
--- # variables declaration in playbook
- hosts: all
vars:
globes: httpd
tasks:
- name: install "{{ globes }}" package
action: yum name='{{ globes }}' state=present
Eg(4):-
--- # 2nd method of variables declaration in playbook
- hosts: all
user: ani
sudo: yes
connection: ssh
gather_facts: yes
vars_files: ( we can declare variables in the form of variable files, in case if we want to use same file to diff playbooks)
- filename.yml
tasks:
- name: install "{{ variable_name }}" package
action: yum name='{{ variable_name }}' state=present
Eg(5):-
--- # 3rd method of variables declaration in playbook
- hosts: all
user: ani
sudo: yes
connection: ssh
gather_facts: yes
vars_prompt: (we can delclare variables with prompting)
- name: globes
prompt: Please Enter The Package Name to Install.
tasks:
- name: install "{{ globes }}" package
action: yum name='{{ globes }}' state=present
Note:- ansible-playbook name.yml --extra-vars "variable=value" (passing variable form command line)
Eg(6):-
--- # multiple tasks in playbook
- hosts: all
user: ani
sudo: yes
connection: ssh
gather_facts: yes
vars_prompt:
- name: variable_name
prompt: Pleae Enter The Package Name to Install.
tasks:
- name: install "{{ variable_name }}" package
action: yum name='{{ variable_name }}' state=present
- name: httpd update
action: yum pkg=httpd state=update
- name: finger delete
action: yum pkg=finger state=absent
Eg(7):-
--- # handlers in playbook
- hosts: all
user: ani
sudo: yes
connection: ssh
gather_facts: yes
vars_prompt:
- name: variable_name
prompt: Pleae Enter The Package Name to Install.
tasks:
- name: install "{{ variable_name }}" package
action: yum name='{{ variable_name }}' state=present
notify: restart vsftpd
handlers:
- name: restart vsftpd
action service name=vsftpd state=restarted
Note:- having ability to call another task, only when the task run successfully(dependency)
specifing when a task/tasks should be run.
Outline the playbook:
---------------------
--- # outlining to my playbook
- hosts: tek
tasks:
- name: Display Date&Time For Begining of Playbook
raw: /usr/bin/date > /home/redhat7/begin_playbook_timestamp.log
- name: Install ftp
yum: pkg=ftp state=present
notify: restart the ftp
- name: install telnet
yum: pkg=telnet state=present
- name: moving logs
raw: yum list installed > /home/redhat7/telnet_installed.log
- name: Display Date&Time For Ending of Playbook
raw: /usr/bin/date > /home/redhat7/end_playbook_timestamp.log
handlers:
- name: restart the ftp
action: service name=ftp state=started
Note:- raw module is used to run the operating system commands
Note:- how to know the command path in linux
* which <command_name>
* which date
* which useradd, cat, touch, ls, usermod, chmod ..etc
* echo $PATH
Note:- yum list
yum list installed
yum list installed vsftpd (or) rpm -q vsftpd
yum info ftp
yum install/update/remove <package_name>
Dry Run:
---------
- without executing the steps, just checking what are the possibilities(format, syntax...etc) ansible will do
eg:- ansible-playbook filename.yml --check
Note:- we will use this in production
Asynchronous Actions and polling:
---------------------------------
- while using ansible against multiple machines, the operations may run longer then usual. so, we will not have a control/track on it.
- to have control whetere the task is running are not and running the tasks parallel, we use async mode.
- maximum runtime to timeout
- how frequently to poll for status
eg:- task-1 (sequence task executions)
task-2
task-3
task-1 | task-2 | task-3(parallel task executions)
- async: 300 (if it running beyond 300 sec then it will automatically get terminated)
- poll: 6
- to get the status of a parallelly running tasks we use poll option.
- it will check and get some data on specified time given.
run once:
---------
- it will run the task only one time in every 1st machine of group, if you specify hosts: tutes also.
eg:- run_once: true
Delegate_to:
------------
specifing a individual host to run the task
eg:- delegate_to: localhost
loop:
----
if you want to run single task multiple times, we use loops
--- # loop
- hosts: all
tasks:
- name: adding list of users
user: name={{ item }} state=present
with_items:
- user1
- user2
- user3
(or)
- vim
- curl
- unzip
- wget
Conditional:
------------
--- # conditional playbook
- hosts: VmTutes
tasks:
- name: install apache2 for ubuntu
command: apt-get -y install apache2
when: ansible_os_family == "ubuntu"
- name: install apache for redhat
command: yum -y install httpd
when: ansible_os_family == "RedHat"
Vault:
-----
ansible allows keeping sensitive data such as passwords/usernames or keys in encrypted files, rather then as plain text in your playbooks.
* ansible-vault create playbook.yml
* ansible-vault edit playbook.yml
* ansible-vault rekey playbook.yml
* ansible-vault decrypt playbook.yml
* ansible-vault encrypt playbook.yml
note:- we can run the file, but we can't see what we written in the playbook.
include statements:
------------------
if you have comman tasks, which is going to be used in many playbooks, we can use 'include statements' rather then re-writing everytime.
eg:- --- # include playbook
- hosts: VmTutes
tasks:
- include: vinu.yml
Tags:
----
- if you want to run a specific task which ever you like, then use tags.
ansible-playbook vinu.yml --tags tag_name
ansible-playbook vinu.yml --skip-tags tag_name
--- # Tags playbook
- hosts: tek
tasks:
- name: enter your name
raw: echo "vinodh" > /home/VmTutes/vinodh.log
tags:
- firstname
- name: designation
raw: echo "devops_engineer" > /home/VmTutes/vinodh.log
tags:
- role
Roles:
------
- we can organize playbooks into a directory structure called roles.
- rather then putting all the content in the playbook, we can divide the content of the playbook into seperate files where we will have seperate directory structure.
- for running diff functionalitys on one machine we need to right multiple tasks, which is not recommanded and difficult to maintain also.
- adding more then one functionalitys to playbooks will make it difficult to maintain in single file.
- and roles concept is advanced one to include statement.
- we can create n-number of roles under roles directory
- Directory Structure
superuser.yml(master playbook)
roles/name-of-the-role
tasks/main.yml
vars/main.yml
handlers/main.yml
defaults/main.yml
meta/main.yml
Note:
default path of roles:
/etc/asible/roles
we can alternately keep the master playbook in a diff location and specify the role path in ansible.cfg
in the /etc/ansible/ansible.cfg, uncomment roles_path and add the roles directory
roles_path =/home/ansible/playbooks/roles
Condition in roles:
-------------------
---
- hosts: VmTutes
roles:
- role-1(role name)
(OR)
- { role: role-1, when: ansible_os_family == "RedHat" }
- { role: role-2, when: ansible_os_family == "Ubuntu" }
wait_for:
----------
- it waits for condition before continuning
---
- hosts: VmTutes
tasks:
- name: install httpd package
yum: pkg=httpd state=latest
- name: wait for service listening on port 80
wait_for:
port: 80
state: started
(OR)
path: /home/redhat02/vinusahi.log
Note:- systemctl start httpd (OR) service httpd start
Moving playbooks from one machine to another:
---------------------------------------------
- here we again we will use version control system (scm/vcs)
1. git init (your playbooks)
2. git push remote repository (github)
3. git clone repo url.....
Task
----
update yum package and
install below packages
- vsftpd
- sysstat
- httpd
- mariadb-server
Remove the existing installed folder
rm -rf /usr/localcw/opt/
Re-create the /usr/localcw/opt/sact directory.
mkdir -p /usr/localcw/opt/sact
Change to the newly created SACT directory.
cd /usr/localcw/opt/sact
Download the current release tarball to the system.
wget†https://sact.it.att.com/dist/sact-client-20211102.tar.gz
Extract the downloaded tarball.
tar xzf sact-client-20211102.tar.gz
Remove the downloaded tarball which is no longer needed.
rm sact-client-20211102.tar.gz
=========THE END=======
+91-7204143230(WhatsApp/Call), Email:- VmTutes@gmail.com