Docker:
- Docker is a software which is going to help to create containers.
- Container service used to develope, shipping, and run the appications.
- it can run anywhere
– physical
– virtual
– cloud - it can run anything
– hosts
– container
- os level virtualization
- we can install this without any hypervisers like vm ware,virtual box…etc
- no need of any dedicated os to docker containers, it consumes from our base os and install bin,lib files of your desired image.
- no need to dedicate any RAM(pre-allocation),HDD,OS to containers because it uses our host os haredware & software…
- docker ensures your aplications and resources are isolated
- scalability of docker is lightweight, portable and docker apps can run anywhere
@ DEV–>BUILD–>SHIP–>RUN
Docker Installation in VM:
- epel ( yum install -y https://dl.fedoraproject.org/pub/epel/epel-release-latest-7.noarch.rpm )
- yum update
- yum install yum-utils
- yum-config-manager –add-repo https://download.docker.com/linux/centos/docker-ce.repo
- yum install -y http://ftp.riken.jp/Linux/cern/centos/7/extras/x86_64/Packages/container-selinux-2.95-2.el7_6.noarch.rpm
Note:- https://stackoverflow.com/questions/45272827/docker-ce-on-rhel-requires-container-selinux-2-9/45287245 - install docker package
yum install docker-ce -y
(or)
rpm -ivh https://download.docker.com/linux/centos/7/x86_64/stable/Packages/docker-ce-cli-20.10.4-3.el7.x86_64.rpm
Note:- https://download.docker.com/linux/centos/7/x86_64/stable/Packages/ - and start the docker daemon
service docker start (or) systemctl start docker - verify
- docker –version
- docker version
- docker info (system properties)
- ps -ef | grep docker
Docker Installation in ec2:
- Before installing docker check ifconfig (or) ip addr, it’ll show you only ethernet0(“eth0”) network. where sys ipaddr exists.
- after installing docker check ifconfig (or) ip addr, it’ll show you docker bridge network i.e “docker0”
Note:- if “ifconfig” is not working then, we need to install it by using this command. “apt install net-tools”
Note:- By using bridge n/w(docker0) it’ll create containers in docker-host and by using eth0 it’ll send traffic outside.
Note:- Docker-Host –> place where the containers run.
Note:- Docker-Guest –> Containers are guests
Docker Editions:
- docker-CE
- docker-EE(lic)
Note:- there is no CE for rhel
Centos/Fedora:
- Install required packages.
sudo yum install -y yum-utils \ device-mapper-persistent-data \ lvm2 - Use the following command to set up the stable repository.
sudo yum-config-manager \ –add-repo \ https://download.docker.com/linux/centos/docker-ce.repo - Install the latest version of Docker CE.
sudo yum install docker-ce - Start Docker.
sudo systemctl start docker - docker –version
Amazon Linux:
- sudo yum update -y
- sudo yum install docker -y
- sudo systemctl start docker
- docker –version
Note:- in amazon linux already docker repos are exists.
Ubuntu:
- If you want particular version of docker to install, then go to official docker docs.
https://docs.docker.com/ –> Download and Install –> Docker Desktop for Linux –> Installation per Linux distro –> Ubuntu
- If you want to install very latest version of docker then fallow bellow command.
- go to https://get.docker.com/ (This is a shell script to install docker latest version)
- curl https://get.docker.com/ | wc -l (or) curl -sL https://get.docker.com/ | wc -l
- curl https://get.docker.com/ | bash
- docker
- docker version
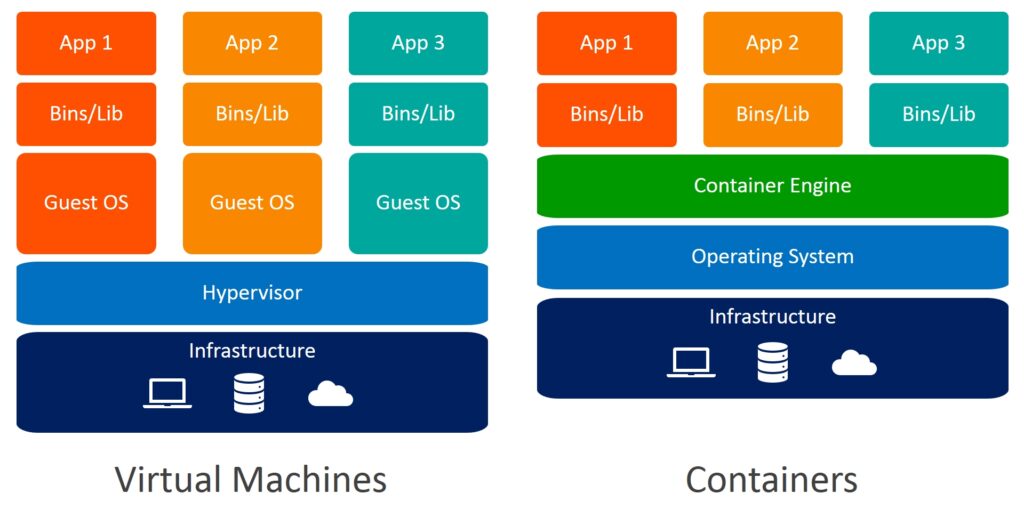
Virtulization vs Containers:
Registrys:
- Docker Hub (Public Registry and it is very famous)
- Elastic Container Registry(ECR)
- Azure Container Registry(ACR)…etc
Docker-hub:
- is a place where we can see all the uploaded images ( https://hub.docker.com )
–> docker search <image name>
Eg:- docker search hello-world –> to see all the images(particular) in docker hub
docker pull hello-world –> to download the image into your local machine
Images:
- Is collection of actions and some metadata, it made of layers, each layer can add,change and remove files
–> A base image is nothing but OS minus kernal. it has only “BOOTFS”
–> Docker image consists different layers the 1st layer of the image consist of OS bootable files of that OS,
only through which it is going to recognize/treating the container as a seperate OS.
and on the top of that whatever we specifing like creating files,installtions,& configurations will treat it as a seperate layers.
–> image are readonly filesystem, we can’t edit. If you want to edit then we need to run the image in a container
–> Docker images are lightweight and portable.

@ docker pull centos
@ docker images
@ docker rmi devops centos ubuntu redhat
@ for one image we can have multiple containers
Note:- every time when we run a “docker run -it <image_name> ” it creates a new container.
@ docker rmi image_name / image_id
Note:- 1.it will not remove when the container is running(forcely (-f) also not possible)
Note:- 2.it will not remove when container is stoped also, we need to forcely delete, if you want.
@ docker tag <ole_tag> <new_tag> (image renaming)
What is Container:
- The word “container” is nothing
- container is a “processes” like how we have in our operating systems(task manager).
- it is a combination of few linux kernal features like namespaces and cgroups
- Namespaces:- one processes should be separated from the other processes on the computer.
it acts like a wall between two processes(isolation) - Cgroups:- are resource limits. it limits the resource(CPU,Memory..etc) for every process.
- Namespaces:- one processes should be separated from the other processes on the computer.
- Finally Docker entered into the market to provide namespaces and cgroups in on place.
Docker is a company which is having docker engine.
- is a running instance of a OS image(base os)(or) container is a copy of image
–> it consists of image and applications
–> we can move,shift,upload,download the containers
–> when we create a container very first thing we will run “/bin/bash” as entry_point called SHELL, which will create environment to run commands in containers. - @ docker run -it centos “/bin/bash”
- -t –> attaching terminal to container
- -i –> interative mode
- @ docker run -itd centos –> running container in a DETACHED mode
- @ docker run -d -it –name VmTutes ubuntu:8 /bin/bash
- @ docker attach (or) docker exec -it bash
- @ cat /etc/osrel* (or) cat /etc/os-release
- @ ps -ef (to check the current running processers
- @ docker run –name globes -it /bin/bash
- @ exit (or) ctrl + d
- @ ctrl + p + q –> (read escape sequence) without stoping container you can come out
- @ docker ps (current running process)
- @ docker ps -a (all)
- @ docker ps -aq (display only container ids)
- @ docker stop ff8bdb8453f6 / container_name
- @ docker start 950cd0c95708 / container_name
- @ docker rm –> Note:- we can forcely remove the running container
- @ docker rm -f
- @ docker info
- @ docker create
- @ docker pull
- @ docker push
- @ sudo docker rename Vinodh-Machireddy-Tutorials VmTutes (we can change the name not the container id)
Inspecting:
Docker inspect fetch complete properties of docker container in the form of ‘key_and_value_pair’ in JSON format(JavaScript Object Notation))
@ docker inspect
@ docker top (to get container’s processess)
@ docker inspect | grep -i ip
@ docker inspect | grep config
@ docker inspect –format ‘{{ .Name }}’ globes
@ docker inspect –format ‘{{ .ID }}’ globes
@ docker inspect –format ‘{{ .NetworkSettings.IPAddress }}’
@ docker inspect –format ‘{{ .Config.Hostname }}’ vinodh
Running container from host system:
- run a command in a running container without attaching terminal to it.
docker exec cbf7fdaed9d7 touch /tmp/hello.txt
docker exec cbf7fdaed9d7 hostname
docker exec cbf7fdaed9d7 yum install git -y
Container resource usage statistics:
- to see the cpu and memory utilizations
docker stats cbf7fdaed9d7
docker exec cbf7fdaed9d7 apt-get update
sudo docker top vmtutes
Events:
- real time live events management for server
docker live events tracking
@ docker events
@ docker events –filter event=attach –filter event=die
@ docker events –filter [label|image|volume|network|daemon|container…etc]
@ docker events –since ‘1h’
Data Volumes:
- it is used to copy, share data from one container to one/more containers
- A volume is a directory(special directory) we create in container to achive this
- in normal NFS we can share data when only two machines are up and running, in our case not required….
- @ docker run –name vol1 -it -v /home/data centos /bin/bash
- @ docker run –name vol2 -it –volumes-from vol1 –privileged=true ubuntu /bin/bash
- @ docker run -it -v /home/vinu:/usr/data ubuntu /bin/bash
Building A custom images:
@ apt-get update
@ apt-get install vim
@ apt-get install git
@ touch t1
@ vi t1
@ docker commit containerid/name (or) docker commit container-name image-name(vinodhk070/ubuntu:8)
@ docker <old_image_name> <new_image_name>tag
Uploading a custom image to docker hub
- docker login
- docker push vinodhk070/ubuntu:8
- docker pull vinodhk070/ubuntu:8
Exposing Ports:
- if you want to access the application running in the container we use port mapping to achive it.
@ docker run -p: -it nginx /bin/bash
@ localhost:90
Note:- – all ports are private by default
– docker run -p (if you not mention any port, then whatever the ports running in the container will map to host with same number in single go.
– all the ports declare with EXPOSE become public.
Daemonized Containers:
- if you want to run your application continuously in container, we achive this by running your container as daemonized.
Here it is not attaching your terminal to container, i.e in the backgroud it is going to run.
eg:-
docker run –name daemon -d centos /bin/bash -c “while true; do echo welcome to devops training; sleep 2; done”
- and if you want to see the running application in the daemonized container
docker logs -f container_name
Automate creation of images
Dockerfile:
- Name of the file which docker will understand to automate the process of creating a image.
- FROM ubuntu:20.04 —>> it will launch the container with ubuntu latest version
LABEL maintainer=”contact@VmTutes.com” —>> optional label instruction for maintainer identity.
RUN apt-get install apache2 —->> to run the task (installing apache package in ubuntu container)
COPY devops /root/devops —>> copying local/host system file/dirs/remote sys URLs to inside container.
ADD https://mirrors.edge.kernel.org/pub/software/scm/git/git-2.24.1.tar.gz /root/vinodh –>> adding remote thing to container.
- CMD “echo”, “welcome to VmTutes training” /bin/bash
docker run -it img1 /bin/bash
docker run -it img1 echo “welcome to devops training” (override)
- ENTRYPOINT [“echo”, “VINODH”] (cannot override)
- WORKDIR /home
- RUN touch app.java
- ENV NAME 9GLOBES
- USER vinodh
- VOLUME [“/home/data”]
- note:-
once enter into the container, first it will run cmd instruction. you can override by passing ‘bin/bash'(or) message.
only one ‘CMD’ instruction should pass in dockerfile. incase if you pass two, the latest one it will took.
/bin/bash –>> login to container
- note:-
we are not able to override entrypoint instruction which is declaried inside dockerfile, it is getting appended.
- note:- it specifies from which particular location we need to run all the instructions, by default root directory.
- note:- if you want to set a environment variable for people who running your image then use keyword ENV
- note:- we can specify on which user account we want to run
default will be on which user account you created docker container
you can specifi runtime also
eg:- docker run -it -u root image04 /bin/bash
eg:-   FROM ubuntu:20.04
       LABEL maintainer="vinodhk070@gmail.com"
       RUN apt-get update
       RUN apt-get install  apache2
       RUN apt-get -y install vim
       RUN mkdir /home/VmTutes
       COPY devops /home/VmTutes/devops
       ADD devops2 /home/VmTutes/devops2
       ADD https://mirrors.edge.kernel.org/pub/software/scm/git/git-2.24.1.tar.gz /home/VmTutes
       ADD git-2.24.1.tar.gz /root/vinodh
       CMD ["echo", "welcome to VmTutes training"]
       ENTRYPOINT ["echo", "VINODH"]
       WORKDIR /tmp
       ENV NAME 9GLOBES
- note:- all the ‘RUN’ instructions can declare in one line also, like below
RUN apt update && apt install git -y && apt install apache2 -y && mkdir /root/vinodh
@ docker build -t :latest.
@ docker run -it
@ docker history (it will show all the layers of composing image)
Microservices:
- Microservices – also known as the microservice architecture – is an architectural style that structures an application as a collection of services that are
- Highly maintainable and testable
Loosely coupled
Independently deployable
Organized around business capabilities
Owned by a small team
Docker-Compose:
def:- docker-compose is a tool where we can describe all the microservices in one single yml file.
eg:- suppose we have 10 microservices in our application, it is very difficulty to run all the microservices one-by-one. instead of that putting all into one yml file and run it.
- we will not use in the production. only we use in development
- by default you will not get docker-compose
- Note:- docker-compose by default you will get with docker software in ‘mac’ and ‘windows’
- docker compose reference:-
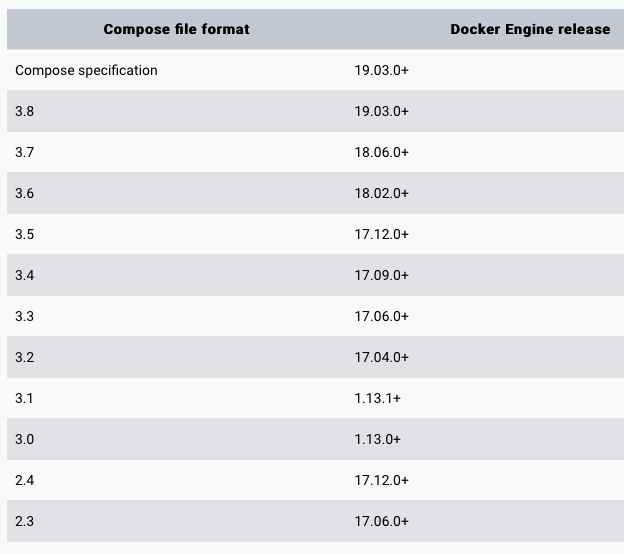
– Compose file format and Docker Engine release should be same
- https://docs.docker.com/compose/install/ (OR) https://github.com/docker/compose/releases
- To download and install the Compose
- curl -SL https://github.com/docker/compose/releases/download/v2.20.3/docker-compose-linux-x86_64 -o /usr/local/bin/docker-compose
- Apply Executable permision to the binary
- chmod +x /usr/local/bin/docker-compose
- Test the installation.
- docker-compose –version (or) -v (or) version
- To Uninstall docker compose
- rm -rf /usr/local/bin/docker-compose
- Note:- the name of the docker compose file should be “docker-compose.yml”
version: '3'

services:

 web:
  image: nginx
  ports:
      - "5000:80"

 database:
image: redis- validate the compose file, by using below command
docker-compose config - run the docker-compose.yml file by command
docker-compose up -d - to bring down the application give
docker-compose down - we can scale single service in multiple conatiners
docker-compose up -d –scale database=5
=========THE END=======
+91-7204143230(WhatsApp/Call), Email:- VmTutes@gmail.com